How to Set Up Your Freebies and Build Your List with Squarespace
How to marry Squarespace with your fave email marketing platform
You might have heard that it’s impossible to build a thriving online or coaching business without an email list. Freebie, lead magnet, content upgrade – all these names mean a free piece of content that you give away in exchange for an email address and permission to communicate with your potential lead. A freebie is an “irresistible bait” – a piece of content so valuable that it could be very easily turned into a paid product.
The money is in the list, they say. And it’s true! Social media platforms come and go but email is still the best way to keep in touch with your audience.
I started my email list in 2019 by promoting my first free guide with a handful of Facebook ads. I’ve got a few thousand people on my list now. Good news – building an email list is actually easier than growing a social media following.
Every time I launch something new – update my Squarespace course or roll out a new Squarespace template – I get an influx of sales.
Emails = sales.
Let me share some tips and tricks I learned while working with Squarespace and two of my favorite email marketing platforms – Flodesk and Mailchimp.
The simplest way to set up your freebie delivery with Squarespace (no additional tools required)
Let’s look at the simplest scenario when the link to your freebie – a PDF, video, quiz (hosted somewhere else) – is located on a thank you page.
You will need:
A freebie itself. If it’s a PDF, you can host it on Squarespace (we’ll show you how). If you have a free class – just upload it to Youtube and generate an “unlisted” link. If you have a quiz – your quiz platform of choice will have an option to generate an embed code.
A freebie mockup – a little illustration showcasing your guide, like this (you can easily create one with Canva or Artboard Studio).
A page with a Newsletter block (you can actually put the Newsletter block into the website footer and freebie will run across your entire site).
A thank you page – a separate page where we will host a link to your freebie or the quiz embed code. The page will say something along the lines of “Thank you! Here’s your guide. Enjoy!”

How to set up your PDF freebie with a Newsletter block and a Thank you page
Create a page and add a headline, subheadings, a freebie mockup image, and a newsletter block, like in the illustration above. Don’t add a headline to the newsletter block. Set the following settings of the newsletter block: Layout – Float; Alignment – Left
Don’t add too much copy to the Newsletter block description field – make it short and concise.
Create a link to your freebie in Squarespace. To do that, Go to the Pages menu and click a plus sign to add a new page to the Not Linked section. Select “Link” and in the menu that pops up click the gear icon and then select “File”. Upload your file and copy its URL.
Create a thank you page and link your freebie to this page via a button. It can say something like “Thank you! Here’s your freebie.” Below this text, there should be a button with a link to your freebie. Protect your thank you page from being indexed by Google by going to Page Settings → SEO → toggle Hide Page from Search Results. This way we ensure that users can only access this page from a redirect (your link) and can’t find it in Google.
In the Newsletter block settings, go to Content → Post submit (you’ll have to scroll down to see this option) → Redirect. You’ll paste your thank you page URL here.
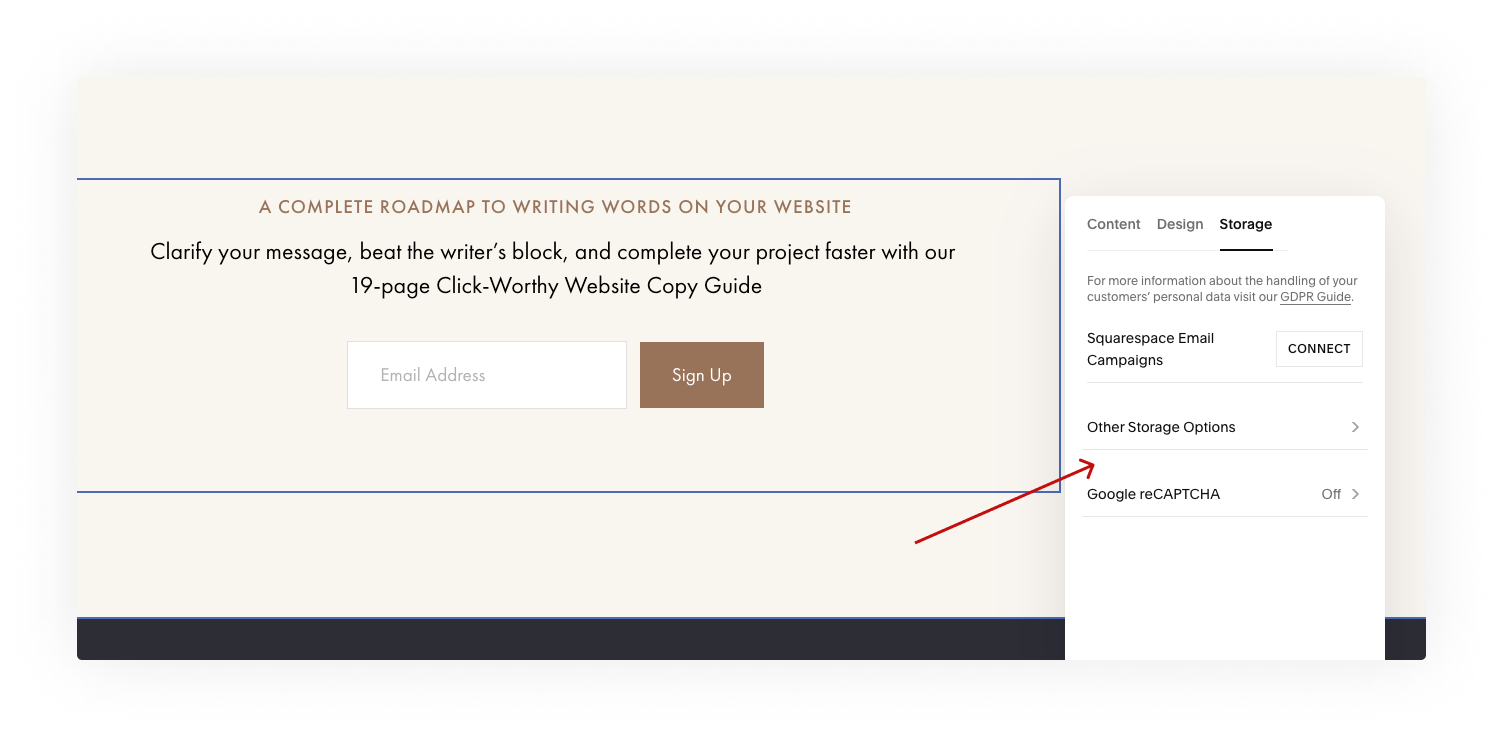
The final step – in your Newsletter block, select a storage option. You can make the information about the subscribers go to a free list with Squarespace campaigns or post them to a Google spreadsheet. We talk about other options below.

Violá! This is the simplest setup possible.
Simple but a limited way:
Connect your Squarespace newsletter form to Mailchimp automatically (via a native integration) and send an email that contains a freebie via Mailchimp
Squarespace has built-in native integration with Mailchimp – this means you only need to click a couple of buttons to connect your website to this email marketing provider.
However, there’s a problem with the automatic integration – it cannot connect a newsletter form to a group or a segment inside an audience. On a free Mailchimp plan, you can have one audience. And the audience is a general umbrella above groups, segments, and tags. If you have multiple freebies and want to connect different forms to them, it can be problematic with automatic Mailchimp integration. On paid plans, you can create multiple audiences – it only makes sense if people you want to connect to can be divided into very distinct groups, for example, vendors and buyers.
So, this method works only if you have one freebie you want to deliver via an automatic email in Mailchimp. Follow these steps:
Prepare a freebie opt-in page that contains a freebie mockup (or any other photo) and a newsletter block.
Prepare a thank you page that will say something like – “Success! Your freebie is on its way. Check your email in about 3 minutes.”
Have your Mailchimp account at hand – a free account allows setting up a welcome email which is what we are going to do
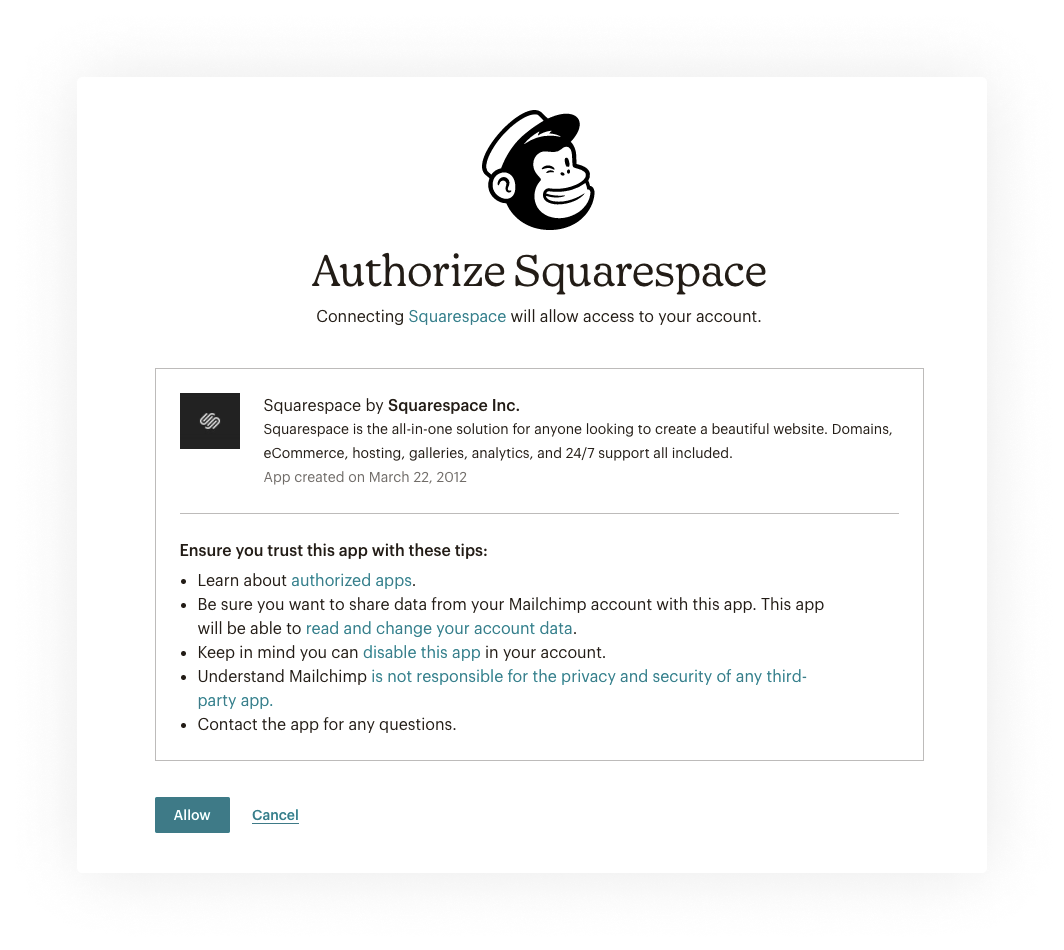
Go to the Newsletter block setting, click Storage → Other storage options → Connect Mailchimp
A pop up window will show up and it will prompt you to authorize your Squarespace account with Mailchimp and select an audience. Save the page!
Next, go to your Mailchimp account and select “Create Journey” under Automations → Customer Journeys. Select “Welcome new contacts”. This journey will be triggered every time someone joins your audience.


Edit the journey – add some welcome text and your freebie to the Welcome email. Here’s more on how to edit this automation in Mailchimp.
Publish your automation and test it!
An advanced way to set up automatic freebie delivery with Zapier and Mailchimp
If you have multiple freebies and want to segment your audience based on what they have downloaded (and trigger different emails based on a form), you’ll need a paid Mailchimp plan and a free Zapier account. On Squarespace, you’ll need a Business plan or higher to connect Zapier.
Follow these steps for each of your freebies:
We assume you already have created your freebie opt-in and thank you pages as explained in the previous steps.
Open Mailchimp and go to Audience → Tags and click “Add tag”. Give your tag the name of your freebie. You’ll have to add the audience emails to the tag in order to create it

Open Squarespace and find your newsletter block. Rename your newsletter block to something you can remember and identify. Go to Storage → Other storage options and select Zapier. You should see a message saying Awaiting connection from Zapier. Save the page!
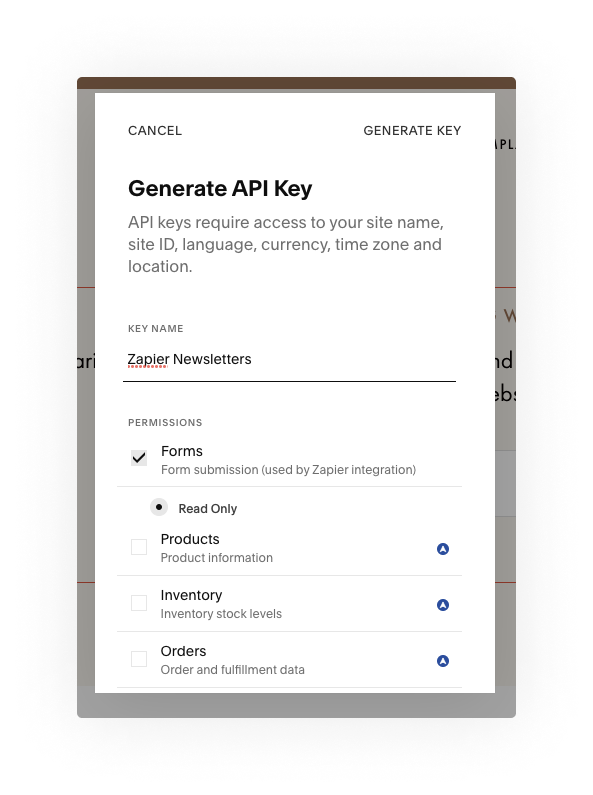
Now in Squarespace, go to Settings → Advanced → Generate API Key → Select “Forms”. Click “Generate Key” and copy the key. Save this key like you would save a password (to a service like LastPass).

Now head over to Zapier and Click “Create a Zap”.
Select a trigger – find and click Squarespace. From the dropdown menu, select “New form submission”. Sign in to Squarespace. In the new window that pops open, paste your unique API key in the field. Click “Yes, Continue”.

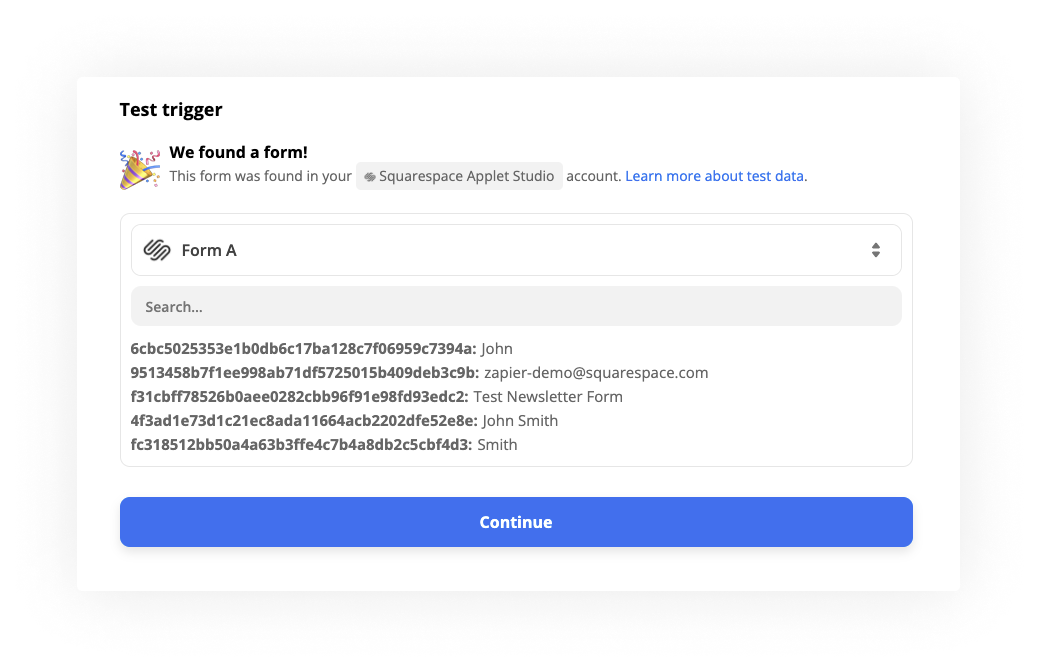
Fill out the information Zapier is asking for. Set up Trigger → Select the form name (in our case, it’s “Test Newsletter form”).


Next, Zapier will show the sample form fields.
Let’s fill out the Action fields: Select an app – Mailchimp. Follow the instructions to authorize Mailchimp with Zapier.

Set Action event – Update Subscriber.

Subscriber email – from the dropdown, select the form field for the email.

Double opt-in – False (the next fields are from the screenshot above)
Update existing – yes
Tags – Put the tag that you have just created in Mailchimp.
First name – select the first name from the dropdown. If you want to add more info into Mailchimp or if your form has more fields, like “Last name”, you can add more than one field here.

Press “Continue” and then test the form. Then publish the zap.
Now, if you go back to Squarespace, and check out the Newsletter block, you’ll see that it has a Zap connected.

Next, set up automatic freebie delivery with Mailchimp.
Test your Squarespace form – you’ll see that the email is posted to Mailchimp with an appropriate tag (the one we just added using Zapier).
Go to Automations → Customer Journeys → Click “Create Journey” at the top right corner. Name your journey.
Edit the starting point – select “Tag added” and choose our tag from the dropdown. Save!


Add an email to the journey. Click the plus icon and then select an Action on the left “Send email”.

Edit your email in Mailchimp, link your PDF (or a page that hosts your quiz) inside that email.
Publish your journey and test it all again!
How to set up your freebie delivery with Squarespace and Flodesk (no Zapier required)
Flodesk + Squarespace is our favorite method and is what we are using all over this website you are now reading!
Why? Flodesk gives incredible flexibility in styling forms via its native editor, no custom coding is required. The forms embed into Squarespace seamlessly. No need to use Zapier.
Flodesk is very intuitive on the backend – like Squarespace of email platforms.
Plus you can get it for an amazing price. You can now get Flodesk for $19/m for a year and $39 after that for UNLIMITED emails and subscribers. Flodesk lacks some features Mailchimp offers but taking into account its price and quality it’s the best email marketing tool for emerging businesses.
Let’s get started!
Create a freebie opt-in page in Squarespace with Flodesk – our design will have a headline at the top, an image on the left, and a description plus a form on the right.
Head over to Flodesk → Forms → Select a form “Inline without image III”. There are multiple options there. We found that adding an image natively in Squarespace allows us to have more control over responsiveness on mobile.

Choose a segment → Name your segment as you name your freebie.
Style the form – don’t add a headline, instead, paste all your body text into the description. Use controls on the right to style the text. Make sure it is the same font and font size/weight as on your Squarespace website. We use Futura/Freight combination – both fonts are available in Squarespace and Flodesk.
Style the button – make it look exactly or similar to your other Squarespace buttons. You can change the shape, add a border, change the size and colors – the settings mirror Squarespace pretty much.
When you’re done styling the form, click Next at the top right corner.
In the Customize tab, select “Don’t enable double opt-in”
When subscribers opt in to this form → Up to you! Do you want to receive emails when someone opts in?
After this form is submitted → Display a thank you page. Paste a URL to your thank you page here. It should say something like “Success! Your freebie is on its way! Check your email now”. Click “Continue”. Download one of our free guides to see our example thank you pages – copywriting guide or design guide.
Next, copy the header code. Paste this code into Squarespace under Settings → Advanced → Code Injection → Header.
Copy the inline code – keep it handy, we are going to need it in Squarespace.
Head over to Squarespace to create an opt-in page. Copy this logic: You will need a section at the top that will contain your headline and subhead. Add one more section and divide it into two columns using spacers. Add two spacers and drag them until each takes 50% of the screen.

Add your freebie mockup image to the left column. Add a code block to the right column and paste your inline form code there. Save!
Test your page and form.
Set up automated freebie delivery email with Flodesk:
Go to Flodesk and click Workflows → +New Workflow → Select “Lead magnet delivery” from the list (scroll down to see it)

Edit the trigger at the top of the workflow: Begin this workflow when → A subscriber is added to a segment → Choose a segment

Edit the email to include your lead magnet and a welcome message.
Publish the workflow and test everything again using the opt-in page in Squarespace.
Testing pro tip: Use the same email, just add +number before the @ sign, for example: test@example.com; test+1@example.com; test+3@example.com. Flodesk thinks these are different emails, however, our email clients ignore everything that’s after the plus sign.
Here you go! Let us know in the comments if this was helpful and feel free to show off your freebies!
Need help customizing your Squarespace site, setting up your freebies, or creating email automations using any email marketing software? Sign up for a consultation using this link.
Visit this page to learn more about our Business Automation services.