How to Create a Customized Cover Page in Squarespace 7.1 (CSS snippet inside)
This short guide teaches you how to bring back a much-loved function of Squarespace 7.0 - cover pages - by creating a page stretching across 100% of screen width and height with header and footer disabled.
Squarespace 7.1 is the new version of our favorite web design platform, released just at the beginning of 2020. While the 7.1 version is a huge improvement on the overall design and workflow of the platform, it is still lacking many features that many of the Squarespace fans would like to see.
Cover pages are one of such features. Hopefully, there’s a really simple workaround that will help you bring cover pages back to 7.1.

What is a cover page, anyway?
A cover page is basically a small one-screen standalone website that has separate styling options and navigation. You can set this website to be shown as a home page and “cover” the site while you are working on the rest of the content and design. Or you can use cover pages:
As landing pages for your lead magnets (freebies) to collect leads
As an Instagram mobile “link in bio“ site with links
As a part of your marketing funnel (in cases where you would need to turn off header and footer of your website)
So, let’s roll up our sleeves and begin the process of turning a regular page into a cover page in Squarespace 7.1.
Step 1. Set up your page in the Not Linked section
Log into your Squarespace website dashboard and head over to the Not Linked section in the Pages menu. In there, create a new page with a blank layout. Name this page as you normally would.

Edit the new page by clicking the “Edit“ button in the left upper corner of the screen.
Add a new page section - click the plus sign to add page content.

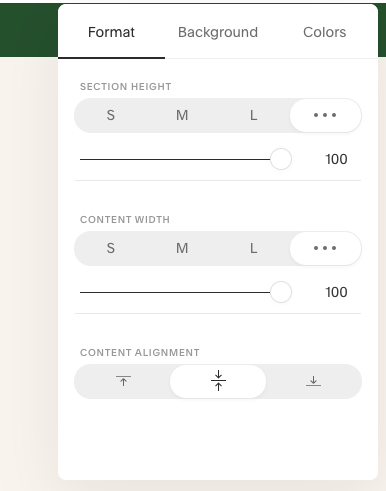
In the page section settings (the pen icon in the right corner), go to the Format tab.
Set the width and height of the page to 100%.
You can also adjust the background and color settings of the section.
Now, work on the layout of the page and add your content. You can divide your page using spacers, add images, headline and text, and a form or a newsletter block. Or you can use a full-width image block to create an interesting layout.
If you would like to use this page as a “link in bio” micro-site for Instagram, add a little intro about yourself and a series of button blocks with appropriate links.
Step 2. Turn off header and footer on that page
Let’s turn off the header and the footer on this page.
Access page settings by clicking the “gear” icon in the right upper corner. Go to the Advanced tab and add the following piece of code.
<style type="text/css">
    header, footer { display: none; }
    section { padding-top: 0  !important; }
</style>
This code will only run on this particular page, removing the header and the footer.

Step 3. Set the created page as a home page (optional)
This step is optional. However, if you need to do some work on your website and would like to hide your process from the visitor, set your page as a homepage.
Go to page settings and scroll down to the General tab. Click the “Set as Homepage” button.
Important note: Unlike in Squarespace 7.0, your new “cover” page uses the global site’s styles for fonts, colors, images and buttons. So if you make a dramatic change on the backend of the site, it will be reflected on the visible front end.
I hope this short guide was helpful! Hop on Instagram and let me know what else you would like to learn about Squarespace 7.1.