Squarespace 7.1 Tutorial 2024: A Complete Expert Overview of the Web Design Platform
How Squarespace 7.1 Fluid Engine works and how to get started with the platform if you’re completely new to web design and need to build website with Squarespace quickly
Squarespace platform integrates web page builder software with blogging, courses, e-commerce and checkout, invoicing, user management, domains, and email marketing tools in one friendly interface. Our small studio started using Squarespace for client projects back in 2019 and fell completely in love with the simplicity of the platform.
The idea behind Squarespace is to have all the tools in one place – previously, you would have to go to several different providers and would probably have to pay a web developer to connect all the tools together. With Squarespace, you have everything under one roof and will save time, money and brain cells in the process of setting up your business. Listen to this podcast episode from NPR if you want to hear more on the history of the 18-year old platform.
Squarespace platform explained in one paragraph: You can whip up a web page in under two hours, connect a domain name, set up a professional email and finally have a place on the internet to call home. A no-headache solution for a simple, yet effective set up. Building a website with Squarespace have never been easier.
Sidenote: Simplicity doesn’t mean that you cannot do cool, trendy, and edgy stuff on Squarespace. Quite the opposite!
So grab your favorite drink, let’s create a free Squarespace trial and take a look at how it all works.
Try Squarespace for free – and save 10% when you purchase a subscription with code APPLET10
Free Squarespace plan: What you can and cannot do
Fist things first, create yourself an account. When you start building a Squarespace website, the platform will prompt you to select a website template:

You can also chose to build your own template and start from scratch. But we recommend you to have a least some starting point and to choose one of the pre-made templates.
Click on whichever template grabs your attention – in version 7.1, they all have the same functionality. So no matter what you start with, you’ll be able to re-create any layout.

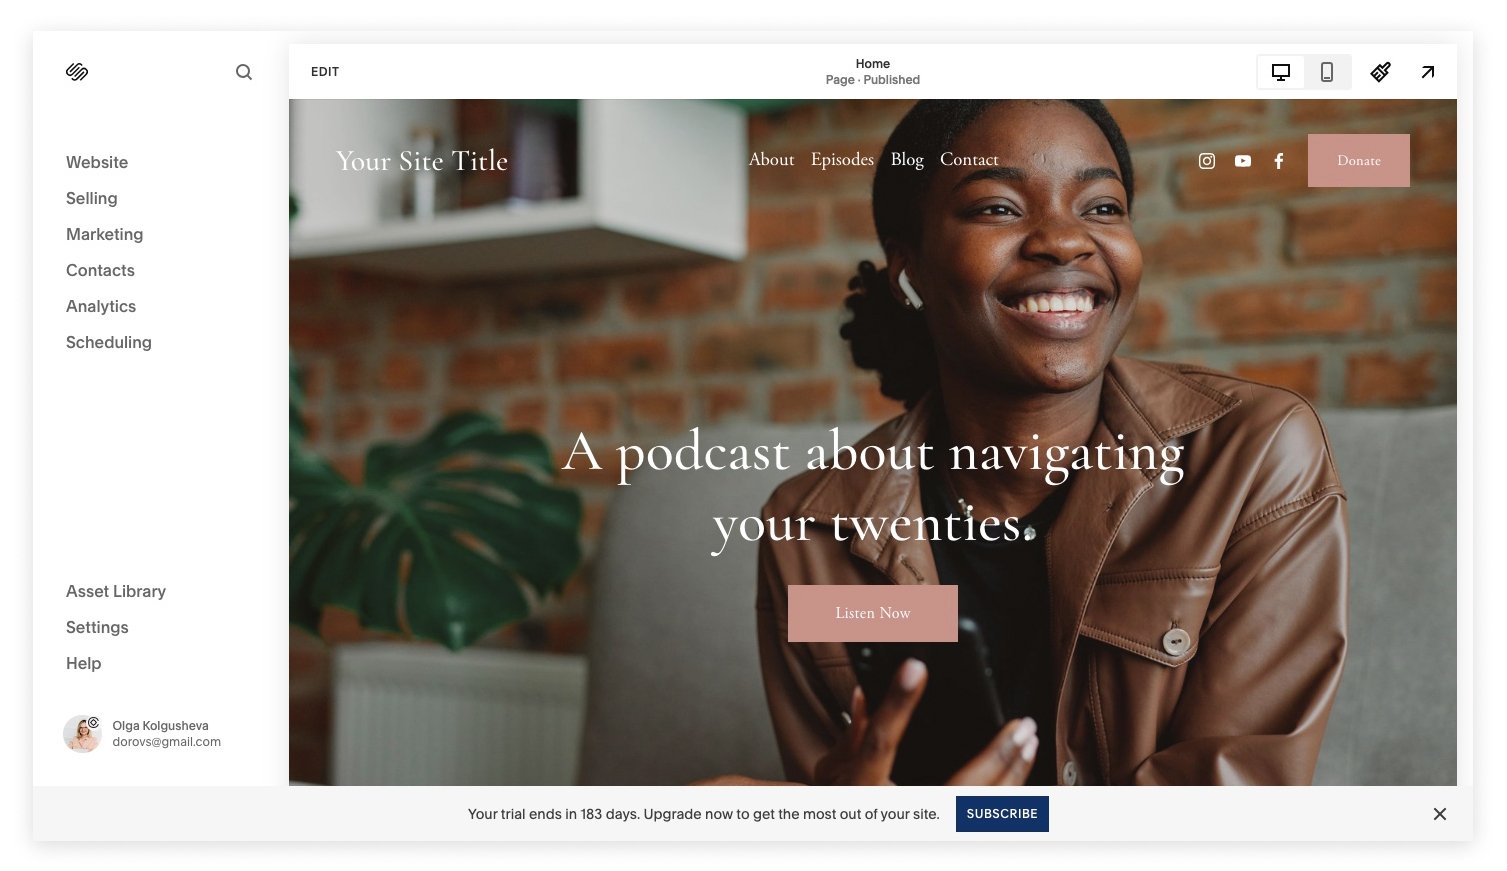
Once you click “Start with...”, you’ll land on your new trial website and it will guide you through some steps – for example, you can set up a website name right away. I usually use the Paloma template as my starting point.

At the bottom of the screen, you’ll see a note “Your trial ends in 14 days. Upgrade now to get the most out of your site.”
What’s the difference between a trial and a paid-for website? Basically, you can’t go live with a trial site although it has all the premium features you can play with. You can password-protect the site and use the internal link to send the site to other people. But when in a trial, the site will be not indexable by Google (because all pages are either under a paywall or pass-protected).
You can create several trial sites in one account - so if you’re just trying things out with Squarespace, you can continue creating new trials and deleting old ones.
How to extend your Squarespace trial
You can email support and they will extend your trial by one week, or use the site duplication feature – duplicate your site and it will start again as a 14-day trial. Just delete the old website.
If you buy a custom Squarespace template from our shop, one of the options is to have it delivered to you as a new 6-month trial – plenty of time to work on your website. We will create your website trial for you and it will be longer, since we are a part of the Squarespace Circle membership.
If you’re a web designer, you can take advantage of the Squarespace Circle membership. In order to join, you need either build or contribute to three paid-for websites. The Circle membership allows you to create an unlimited number of 6-month trials in your account. Also, you get access to exclusive discounts and perks.
See? You can do a lot in Squarespace without upgrading. Play with the tool, create multiple trials, test things out, build a Squarespace website before you commit to the platform and pay for your website to be published on the internet.
Squarespace 7.1 Fluid Engine interface overview
So you just landed on an actual Squarespace website – what do you do next?
Sip your coffee and let’s look around.
At the left of the screen you see the menu of options:
Website will take you to the Pages menu, where you can and access all the website pages, including the blog, portfolio and store pages.
If you go down the menu, you see all the stuff Squarespace has to offer – Marketing features, Analytics, general settings, e-commerce options, etc.
You can edit the page you are currently seeing by clicking the edit button in the top left corner of the screen. When editing, don’t forget to save your work - click “done” at the top left and save!
You can quickly access the design styles too – click the brush icon at the top right.

You can also enter the mobile preview mode by clicking the mobile icon at the top right.
Check out the arrow at the top right corner - you can enter a desktop preview mode and you will see how your live site looks.
Need to look at the tablet version? Squarespace removed this feature in 7.1 – so you can just do so by resizing the browser window.
So here’s the global Squarespace logic: You can edit the current page while some settings are open in the left or right sidebar. You can move elements around on the page while tweaking the design settings – the result is immediate.
Squarespace 7.1 Fluid Engine supports tweaking the mobile version of your website. Previously, you could only edit the desktop version of the website and the mobile version was generated automatically. All elements automatically stacked on top of each other on mobile devices. Whereas now, you can actually make edits in the mobile version of the website if you don’t like the way it was generated. In other words, mobile layout is now independent of the computer layout.
To edit mobile view, switch to device view by clicking mobile icon in the top right corner and click Edit in the top-left corner. While you are able to edit text in text blocks, open block editors, move blocks, add new sections, open section styles, move sections up or down, delete blocks and sections, it's not possible to add new blocks.
Things to do when you first start building a Squarespace website:
Go to Settings -> Site Availability and set the password for your site.
Go to Settings -> Domains and change the built-in domain name to something easier to spell. Type it in Site ID.
Click Edit on any page, hover over the top of the page and then click Edit header. Now, click directly on your site title either to change it or to upload a logo.

When you click Edit header you will also have two other options – to either edit elements or edit design.

(This is a part where you need to sip that coffee again)
How pages and page sections work in Squarespace 7.1
Open the Pages tab on the left – this is your website’s catalog. All your content will be here.
Everything that’s under the Main Navigation will appear in your website’s header.
Pages in the ‘Not Linked’ section are public unless they’re disabled or password-protected, but they don’t appear in the navigation. The Not Linked pages are also discoverable by search engines.

This menu is also the place to check your Squarespace version. Look all the way down to see Version 7.1 (or 7.0 in this case you need an update).
So why would you want to put a page in the Not Linked section, at all? There is a valid reason. You shouldn’t put everything in your website’s main navigation. It will probably fit 3-5 items max before starting to break into a second row (ugly, right?)
Use the Not Linked section to host all other pages – your sales page, pages you will link to from the footer, all the pages you will link to via buttons, etc.
Click the plus sign to add a new page and you will see all the available types of pages plus the ability to add a dropdown (previously a folder) or a link.

There are two types of pages in Squarespace 7.1 – the regular “pages” and collections.
A standard page is a page to which you can add stacking sections. Each section will have unique color and layout settings.
A collection is a page that hosts other sub pages – like posts (for blogs) and products (for stores).
Think about a collection page as a house and posts (or portfolios) are rooms. The house has exterior design settings as well as unique styles for rooms. All of that you can set up through Squarespace's simple UI.
Regular long scrolling pages can be really long – add as many sections as you wish but remember that a long page will probably be slow, which is damaging for SEO.
How page sections work in Squarespace 7.1
Each page consists of internal building blocks – sections.
Each section has unique styling options. In the Format tab, you can tweak your grid (change the row count, add or delete the gaps), change the content alignment in the section, or change the section height. Here, you can also add a divider at the bottom of the section.

You can set the section's background image or video in the section settings as well. For example, you can set a background image and then add content to the section like text and other images and all these blocks will overlay the original background images.
In the color settings of the section, you can select a color theme – Squarespace automatically generates 10 section color themes from a pre-defined palette. You can edit color settings in the Design tab, and select them later in the settings of each section.
These settings allow us to create an unlimited number of color and layout combinations to create a web page that’s not boring.
How to add text blocks and images to a page section
When adding a page section, you have an option to select a pre-defined layout that’s already populated with elements – text blocks, images, videos, and buttons. Browse these layouts for inspiration!

In Squarespace 7.1, you can easily re-create any of these layouts from scratch just by arranging elements on the page.
When you enter a section editing mode, click the Add block at the upper left corner of the section and a menu of page elements will appear.

Here you can choose an element you’d like to add. Squarespace 7.1 Fluid Engine is an easy-to-use modern drag-and-drop editor. Since Squarespace websites have flexible grids you can place blocks anywhere, even overlapping other blocks, and resize them directly on the page.
Once you add content to your page, don’t forget to save it!
Our tips and best practices on working with pages in Squarespace 7.1
1. Create a draft page and pass-protect your pages
If your website is already published online, there isn’t a way to save a page as a draft in Squarespace. You create a page and you have to immediately publish it. All changes need to be saved.
However, you can create a page that's hidden from your main navigation and website visitors. Create a page in the Not Linked section and password-protect it. This way, you’ll be able to continue working on it without exposing any changes to your website and business. Password-protected pages are not indexable by Google.
2. Set up your navigation from the get-go
Keeping your website clean and organized is good for SEO. Work on your site map before you start building out the pages. Decide what pages will go in the main navigation and what pages will stay in the Not Linked section. Pass-protect and remove the pages you are not actively using from the Not Linked section. Remember that less is more and the more organized, logical and helpful your site is, the better it will rank on Google.
3. Set up SEO settings
Access settings of each page you just created and write a meta description and a headline for Google. It’s a small step that often gets overlooked. You get to control how exactly people will see your site in search results. You can also set up site-wide SEO settings and control how your blog post links will show up in Google (and all other search engines).
Hey, here’s a little homework assignment for you:
Create a free trial in Squarespace (pick any default template, they are all the same!)
Decide on your site map and create all pages – add some to the main navigation menu and some to the Not Linked section. A logical, defined structure will help you rank higher in Google
Add SEO descriptions to all pages and edit the URL slugs so they contain your essential keywords
To access SEO settings click a gear icon next to a page you are going to work on. You’ll find URL slug in General tab, and SEO title and meta description in SEO tab. Click Save once done editing.

How to set up fonts and colors in Squarespace Fluid Engine
Now that you have a site map in place, let the real fun begin! The most rewarding part of setting up a Squarespace website is tweaking colors and fonts.
Click the brush icon at the top right corner to access the style settings of your website. A menu will appear on the right-hand side and your current page will go into the editing mode. From here you can add your fonts, colors, animations and tweak the appearance of some of the common blocks, like buttons, forms, and image layouts.
Head over to the fonts menu. Here’s what happens here:
You can select a pre-defined font pack and it will apply to your whole website. A font pack is basically a font pair with all sizes, weights and letter spacing applied where necessary throughout your whole website.
You can use global text styles to select individual fonts for headlines, paragraphs, buttons and miscellaneous like product prices and blog navigation.
Once you finalize your core fonts in the global settings, you can go into the “Assign styles” menu down below and tweak the fonts for individual blocks. For example, you can tweak the exact font to be used as your site’s logo – pick a completely different font, and manage size, letter-spacing, and font-weight.

Font choices in Squarespace Fluid Engine allow creating a streamlined logic: You can assign fonts to paragraphs and headlines and Squarespace will populate the rest of the site with the same fonts.
If you want more customization, use the Assign styles menu to tweak individual options.
How color settings work in Squarespace 7.1
Color settings in Squarespace use similar streamlined logic.
Go to site styles by clicking the brush icon and click Colors. Squarespace gives us the ability to choose a pre-made designer color palette or create our own palette out of five colors. We can choose accent, light, and dark colors in the palette, and out of these colors, Squarespace generates ten color themes.

The easiest route in creating a stunning color palette is using the built-in color palette generator. You can upload an image and Squarespace will pick all the colors for you, or, you can select a core bright brand color and Squarespace will suggest several palettes around that key color. To access these features, just click Edit palette. You’ll find monochrome, complementary, and analogous color palettes. If you need more help with the color palette, check out our color guide for non-designers.
Next, from your chosen colors, Squarespace will create ten custom color themes. You can apply these themes to website sections
You can customize the colors even further by accessing each color theme and changing the colors of individual blocks in each theme. For example, you can tweak the colors of things like headlines and body copy, buttons, and announcement bar for individual color themes.
What to do if you wanted to change the color of the biggest headline on the page - here’s a step by step tutorial:
Click Edit the page that contains that particular headline.
In the upper right corner, find the brush icon which will bring up the site’s styles.
Go to Colors and take a look at the section that contains the headline you want to change the color of. Squarespace will show the color theme names of the sections, like, “Lightest 1”, “Light 1”, “Dark 1”, etc. Find the corresponding section color menu at the right and click through. For example, we’d like to change the color of the biggest headline in the section of the Lightest 1 color. Click the section theme name and it will bring up controls for individual color settings.
Next, click Heading (Extra large) and change the color – you can select one of the palette colors or pick a custom color.
Don’t forget to go back and save your work!
While color settings in Squarespace are based around a pre-defined palette, you can change the colors of individual blocks, like, text options, background colors, etc.
Here’s the main secret to making your Squarespace palette work: Follow the guidelines Squarespace gives you. The colors in the palette have names for a reason: It’s a design system. So, in a place where it says “light” color, put a light color, use a dark shade for “dark”, etc. This way, your ten predefined color themes will really work for the website, creating a consistent design.
How to style your blog and shop
Collections are pages that can host other page types: products, blog posts, events, portfolios, and more.
They all use similar logic in how content is added and style settings are applied.
You add a collection like a regular page – go to Pages menu and click the plus sign either in Main Navigation or in Not Linked. Currently, there are six collection types available:
Blog
Store
Portfolios
Events
Videos
Course
When you add a collection, you’ll be prompted to immediately select a layout. Don’t worry! Select any layout - you’ll be able to tweak the layout settings later.
The main host collection pages work just as well as any other pages – you can add more sections before and after the main posts grid (like blog posts or shop products).
To edit the style settings of the posts grid, head over to the section settings – we’re talking about the section that contains the posts (or portfolios, or products).

To tweak the style settings of typography, colors, or spacing in the individual posts (or products) – go general site’s style settings, go to Fonts and select Assign styles in the menu on the left.
Basically, any style settings you can’t find in the section settings will be located in the main style menu.
How to launch your Squarespace website
We compiled a list of things you need to do before launching:
Connect social accounts to your site
Connect socials to your site. Go to Settings -> Social Links and paste links to your company's social profiles. You will be able to use these settings inside various blocks – display social links in the header and footer, show your Instagram feed, etc.
Configure promotional pop-up and announcement bar
These two marketing features are must-haves. Access them inside the Marketing panel.
An announcement bar shows up at the top of the website. Use a contrasting color to bring attention to this feature. Put your free opt-in, announcement, or the latest blog post here. Find the announcement bar's styling options inside the website styles (in Font and Color sections).
A promotional popup is a strategic tool you can use to engage your website's visitors. Check out the popup's rich features inside the Marketing panel. You can change the popup's style settings, define the target action, and display timing. The popup has to promote the next step you want your visitors to take with you. Don’t know how to use popups? Here is how to use them to capture leads on your website.
Don't forget to set up UTMs to track the links you put into bars and popups
Configure forms and connect email marketing software
Plan ahead what forms you will need on your website. Once someone fills out a form on your website, they can be either shown a message or be redirected to a thank you page. We highly recommend using the second option. You can display your front-end offer or invite people to schedule a free onboarding call with you on a thank you page. Also, you can easily track conversions inside your Google Analytics account by using Goals (more on that later).
You can connect practically any email marketing software to your forms using Zapier. We recommend using Mailchimp + Zapier if you want to group subscribers and deliver multiple freebies.
Don't forget to add Google Recaptcha to your forms. Recaptcha API keys can be entered inside API Keys menu in the Advanced Settings panel.
Customize 404 page, lock screen and browser icon
Let's go beyond the default Squarespace 404 page. You can create a page in Squarespace and assign it to act like a 404 page. Place a search bar, a grid of your recent posts or a freebie on this page.

Customize the lock screen if you are planning to use password-protected pages on your site. It's a great way to host, let's say, a client vault or a library of freebies on your website.
Finally, let's customize a fav icon (also called browser icon). Create a small image, upload it to your site and watch the default Squarespace grey cube go away.
Set up redirects
This often gets overlooked by people who are redesigning their websites completely. If you are designing a new website and your link structure has changed, you want to set up URL redirects inside Squarespace. This is to make sure you don't lose any search traffic from Google.
Find them in Settings > Developer Tools > URL Mappings tab and set up 301 redirects.
Scheduling tool
Squarespace's Acuity Scheduling is a perfect tool to set up an automatic system where your potential clients can schedule a call with you. It integrates with Squarespace completely and has adequate pricing plans.
Don't want to use Acuity? Try Calendly – it has pretty much the same features.
Both tools eliminate consistent email back and forth and save a lot of time.
Connect a domain name and G suite
Connect your domain name. Find this option inside the settings panel. If you get a domain name from a third-party provider and connect it to Squarespace through the "use a domain I own" feature. Once you connect a domain name, you can set up G suite and get a professional email with Google.
Connect Google Analytics & Google Search Console
Squarespace has a built-in integration for Google Analytics. Go to Settings, and then click Developer Tools. Click External API Keys. In the Google Analytics Account Number box, enter your tracking ID for this site. For help finding this ID, visit Google's documentation.
Verify your site with Google Search Console (previously Webmaster Tools). In the Home Menu, click Settings. Go to Connected Accounts and click Connect Account. Select Google Search Console. Then log into the Google account you want to connect to your site. Please refer to Squarespace's documentation for more details.
GDPR Compliance
Depending on what type of business you operate and what audience you serve, you might be subject to some European privacy laws, commonly known as GDPR or "cookie law". Some U.S. states also have similar laws on the books (like California) or are considering enacting some form of consumer protection enforcement. In either way, it is your responsibility as the website owner to do the research and take the necessary steps to comply with international and domestic laws.
Having said that, since the vast majority of websites actually do have to comply with the GDPR laws, Squarespace has built-in several features to make it easier for you to comply with some requirements. In a vast majority of cases, you would need to have a "cookie bar", and a privacy policy and terms and conditions pages.
Cookie bar
In Squarespace, the "cookie bar" is a narrow visual overlay warning your website visitors that you are collecting some personal data. To enable and set it up, navigate to Settings -> Cookies & Visitor Data.
Privacy Policy and Terms and Conditions
If you need to, add the Privacy Policy page and the Terms and Conditions page as you would any other page. Make sure to add links to it on your website, ideally on all website pages via the website footer.
Need more guidance?
If you want to spare yourself some effort and launch faster, or you don’t want to pick up colors, fonts, and layouts, check out pre-made Squarespace templates in our shop. We have got many designs for entrepreneurs in different niches. Plus, you will get Easy Squarespace course in addition to any template you buy.