Beautiful Gallery Customizations for Photographers in Squarespace 7.1 (Full Tutorials & CSS Snippets Inside)
Awesome gallery section tweaks and plugins for your next photography website project on Squarespace 7.1

Galleries in Squarespace 7.1 are fabulous but sometimes you just need to get a little fancier. Take your photography website to the next level with these awesome and easy-to-use Squarespace gallery plugins!
How galleries work in Squarespace 7.1
Let’s start by exploring how you can add a gallery to any page on your Squarespace website.
You can create a new blank page and add a gallery as a section to it. Or, alternatively, you can get started with a predefined gallery layout.

It doesn’t matter which gallery layout you choose at this point - you will be able to change the settings later. On the right-hand side of your newly added gallery section, you’ll see section controls - this is the exact place where you can add images to the gallery and change the settings such as layout, section colors, animations, transitions, etc.

What’s the good news here? You can have several galleries as sections on a page and all of them will have different designs. For example, you can start your page with a full-bleed slideshow and overlay a short headline over it (more on how to do this with a bit of CSS later). Then you would add a small blurb of text and a gallery grid - to give more details and context. You can create a whole narrative by mixing different gallery layouts with static images and text - we’re showing an example of this in our Indie Studio template. When you add portfolio pages to your site, you also have the option to combine several page sections on top of each other - including the mighty gallery sections.
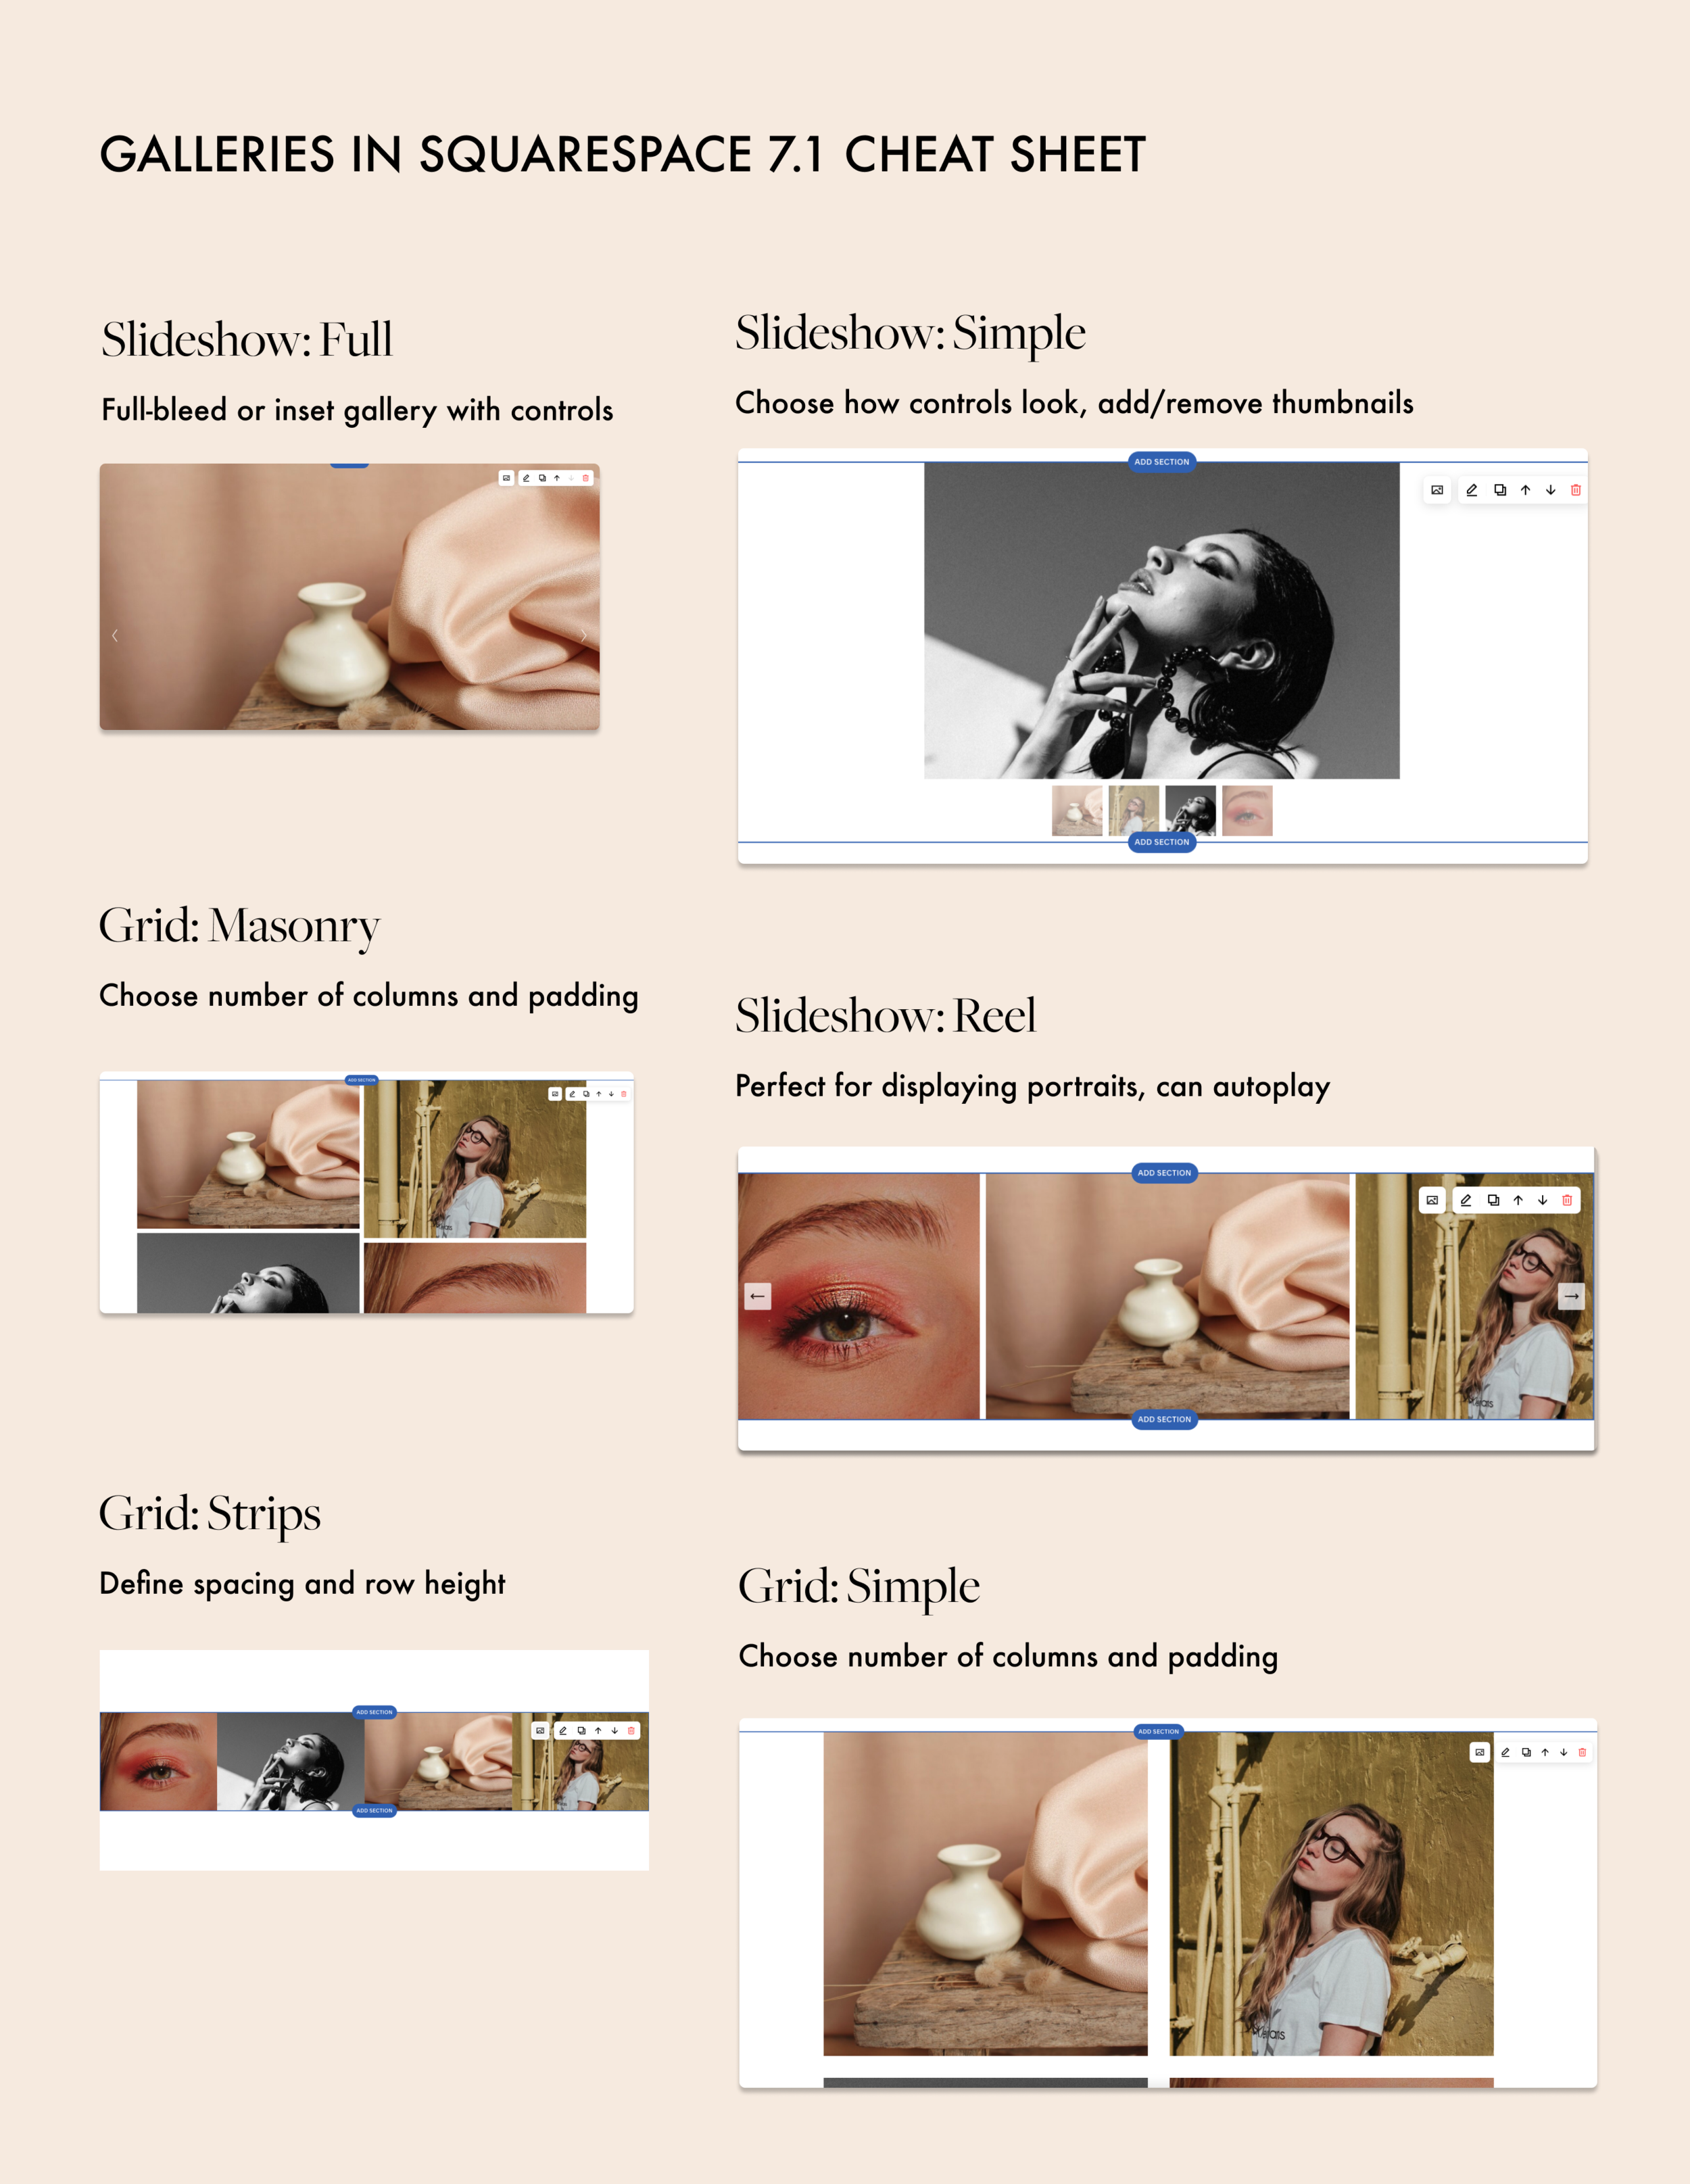
Here’s a little visual cheat sheet for you on how different gallery types can look and can be styled:
Is it possible to add a gallery as a block to a section? Sometimes you want some static text on the left and a gallery on the right. There’s a little workaround trick. Blog post pages still have the functionality to add gallery blocks (a feature from the previous version of Squarespace). And we can copy and paste these blocks using a third-party Chrome plugin. Here’s how to bring gallery blocks to Squarespace 7.1.
Problems that might arise with default galleries in Squarespace 7.1:
A transparent header isn’t transparent over a full-bleed full gallery
No way to edit how the caption looks in a gallery - no control over the font and color
No way to add padding to images in the reel gallery
Limited styling options for carousel controls
Not all gallery types have an option to automatically play the slides
Let’s explore how to fix these issues with a little bit of custom code:
Fix 1. Transparent fullscreen slideshow gallery over header
Let’s say you want a full bleed gallery with full-width images as a top hero section on a page and you also want the website header to be transparent over the section. You set the header to be transparent in the header setting - but it doesn’t work over a full slideshow gallery.
Here’s a fix you can use to modify the gallery. Add the following piece of code to Design -> Custom CSS. Notice that you can change the gallery height on mobile: it’s currently set to 60vh (% of viewport height), you can change this number to anything you want.
// Transparent gallery over header

.page-section.gallery-section {
    padding-top: 0px !important;
}
@media screen and (min-width: 640px) {
    .gallery-fullscreen-slideshow {
        height: 120vh !important;
    }
}
@media screen and (max-width: 640px) {
    .gallery-fullscreen-slideshow {
        height: 60vh !important; // Change this value to modify gallery height on mobile
    }
}
.gallery-fullscreen-slideshow[data-show-captions="true"][data-width="full-bleed"] {
    margin-bottom: 0;
}
Fix 2. Change how gallery controls look in a fullscreen gallery
Now you’ve got an amazing full-screen gallery - let’s change the look of the controls. You can hide them using Squarespace settings - but we suggest keeping them for a better user experience.
Add the following code to the CSS editor. You can change the size of the controls, their color and the color of their background.
// Gallery controls
// Change the size of the controls
.gallery-fullscreen-slideshow-control-btn-icon svg {
    width: 40px !important;
    height: 40px !important;
}

// Transparent controls color
.gallery-fullscreen-slideshow-control-btn::before {
  background-color: transparent !important;
}

// Change controls color
.gallery-fullscreen-slideshow-control-btn svg {
  stroke:white;
}
Fix 3. Style full screen slideshow gallery captions
Finally, let’s add a beautiful caption to the full screen gallery. Use the following snippet. You can change the color of the font, modify the position (by tweaking the “top: 68%” value), add your site’s font family and change the font size (in em’s). Please notice that this snippet will work for a really short caption. You can change image captions when you upload new images.
// Gallery caption position and color

figcaption.gallery-caption.gallery-caption-fullscreen-slideshow {
    position: absolute;
    top: 68%;
   // background: rgba(0,0,0,0.5);
    color: white;
    left: 0%;
    text-align: center;
}

// Change font styles

p.gallery-caption-content {
font-family: ‘your-font-family-here’ !important;
font-size: 2em !important;
}
Fix 4. Add white border (padding) to images in a reel gallery
Gallery Slideshow: Reel doesn’t have an option to add spacing around images. Sometimes you want to add a little bit of margin to make sure images don’t blend together. Here’s an easy way to fix this. Add the following snippet to your CSS editor and don’t forget to change the value of the margin (currently, it is set to 10px).
// Add margin between gallery slideshow images
.gallery-reel-item img {left: 10px !important;}
Fix 5. Have Slideshow: Reel gallery automatically play the slides
There’s no way to set reel slides to autoplay. Here’s a simple code to have them automatically transition for nice animation.
Add the following script to the header portion of the Code Injection section (Settings -> Advanced -> Code Injection)
<script src="//ajax.googleapis.com/ajax/libs/jquery/2.0.2/jquery.min.js"></script>
Add the following script to the footer portion in the Code Injection tab or to an Advanced tab on a particular page.
<script>
  const init = () => {
    setInterval(() => {
        $('.gallery-reel-control [aria-label="Next Slide"]').trigger('click');
    }, 6000); // change this value to change the speed
  }

  document.addEventListener('DOMContentLoaded', init);

</script>

Hope you enjoyed these short tutorials! Check out our Indie Studio Squarespace template to see these tips in action. If you're a photographer looking to build a kick-ass online presence with Squarespace, believe us, the platform is so simple and powerful, you can build a website that will look polished and professional in a weekend.
Have questions about Squarespace and web design? We’re pretty active on Instagram. Send us a DM or send us an email via a Contact form.
Happy creating!